Saturday 28 May 2011

Mini-Dresser Mini-Book

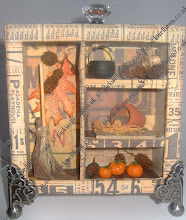
Okay, so this isn't quite finished yet (no book inside for a start... and the bottom needs a good lick of crackle paint)... but I couldn't resist showing off this new mini-book cover I made. Chances are, I made it in the most difficult, round-a-bout, hardest, fiddly-est way possible... but I did it! *lol*
It's all paper and card, crackle paint, glossy accents... and a bit of acetate and a couple of hitch fastenings (a la Tim Holtz - TH92731). Oh, and a LOT of Scor-Tape and glue :)
This one opens with a side-hinge made from Kraft paper and strengthened with Tyvek...
and the 'door' is about half an inch thick. Both drawers are fake - but they are useful in that the drawer handles are used to pull open the door to reveal the minibook inside. The dresser window is acetate, and all the crockery inside is cut out of paper and blobbed with Clear Glossy Accents from Ranger (GAC17042).
Some of the 'plates' are decoupaged (the rims), and the other crockery is just bent rounded slightly to give it some shape - all stuck on with silicone glue. My original idea was to put a real mini tea-set into a box like this... but I couldn't bear to glue down such cute little pieces... so paper it was - though cutting out the handles on the caups, jug and some of the plates was a pain!
The feet are made the same way paper beads are done - just glue and rolled strips of paper. I didn't have feet on it at first, and although the paper feet are strong, the addition of these to the project makes it less steady (though it doesn't topple over at all)... Eventually I decided to keep the feet - it does look better :)
The inside of the box is empty - and is smply decorated with leftover paper. All the patterned paper used in this dresser was leftovers from that Henbury Lane A4 paper I had... it's never-ending!
The 'door' is stopped from closing in on the box completely by two small pieces of chipboard in the right hand corners.
It's not the prettiest solution, but it does work well, and doesn't take up too much space. The size of the inside of the box for the album will be: 4.75"x7.75"... not a bad size for an album.
Well... that's my 'Big Reveal'... I'm just so pleased because it's all my own - my idea, no measurements from anyone else... and I haven't seen anything like this anywhere else.

And just a quick update (yes, Dawn... for you *lol*):
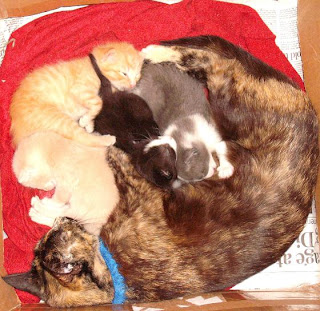
Callie and her kittens are doing well- as this photograph from yesterday shows. Boo has now the nickname 'BooBear' - because he is one HUGE bundle of solid fluffiness :)
I think I shall miss this little bundles of miaowing fur when they're re-homed.

Blogger 'comment' troubles?

I've finally managed to start commenting on people's blogs again "YAYYY!!!!!"
For those with the same problem as I had:
"I login at my dashboard, no problems there. I go to a blogger blog and comment, and instead of my username being there I have to pick "google account", which then takes me to the login screen, where I login (selecting remember me), and I get taken to the comment form again, and show up as anonymous, instead of as my user name. Then I type the word verification, and click post, and it takes me to the login screen again. Then after I login again it takes me to the comment, and I have to start all over again." (AMYH41111)
then there's a list of solution Blogger advises you to try:

0) Make sure you are running the latest version of your browser, if not, upgrade it.
1) Make sure you REALLY have cleared both your COOKIES and CACHE
2) Once cleared shut down the browser
3) Then open it again and Check that the Cookies and Cache are indeed Empty. This is very important. The problem seems to be with corrupt cookies and cache files
4) If that is OK try going to www.blogger.com . Don't login yet, press CTRL-F5 and then try logging in again
5) If that still does not work try logging into Gmail first and then go to www.blogger.com and try again
6) If that does not work try going to this address http://www2.blogger.com/home
7) If that does not work try going to draft.blogger.com
8) If all those fail, try installing another browser to see if that works eg Firefox, Chrome, Opera etc

Here's my answer to that:

I cleared cookies etc, and then tried the trick of NOT clicking the "keep me signed in" box. This appears to have worked .... but surely this is not the point - why isn't Blogger just working? I shouldn't have to go through this rigmarole every time I want to use Blogger! As for advising people to use a different browser... WHAT??!! You want me to download a completely different browser just so as I can leave comments on Blogger? Are you insane??? How unprofessional this sounds... it's like passing the buck - Blogger doesn't work properly and so the users have to find a way of fixing the problem rather than Blogger themselves sorting it out and correcting what's wrong.
~*~*~*~*~*~*~*~*~
Okay, so I ranted a bit :) But.... puhleeeease!

Anyways, I have managed to catch up with a few people... and I'm so sorry if I haven't managed to comment on everyone's amazing and wonderful blog entries as yet... but there's only so many hours in a day *lol*

Friday 27 May 2011

All crafted out! Book Mini.

I am now calm... honest *lol*
I've had a few days non-stop crafting except for the hospital trip on Wednesday - collecting my new walking sticks and wrist supports (hence no WOYWW for me this week) and the kitchen fire yesterday. Yes... the kitchen fire. Apparently I'm not the only klutz in the family, and my son is quite good at creating mess and mistakes too :) It's amazing that nomatter how sore and aching you feel, you can move like the clappers when your son calls out to you to say that there are flames in the kitchen hitting the ceiling. No harm done though - nothing a wet tea-towel and a bit of calm didn't control and dampen out the flames :)
So... back to the crafting...
I finished the book to go inside the book cover I altered. I used the Paris Night gcd papers, and a few MME loose sheets I had laying around. I used a full-length gatefold style... and here's a few pages for you to see how it turned out:


As well as the Tim Holtz Visual Artistry stamp collection (Urban Grunge - CSS25917), I used Art-Parts Limited Edition 'Captivated' stamp collection also (LE5533) and my usual La Blanche swirly stamp too :)
Each page (8 double-sided) is different and has a journalling spot, a tag, or both. The pages measure 7.25" by 4"... just enough to put a full size 6"x4" photograph and a description if needed.

So... as well as this project I have helped my daughter complete her year book - I was up till half three this morning! I've completed a Halloween Mini that I shall probably give away later in the year... AND... I have made the case for THE cutest mini ever. It's a Welsh dresser style box - all I have to do is put some feet onto it. It's full of crockery that is simply made from paper and smothered in glossy accents - though cutting out handles of cups that are only 8mm high is a bit difficult and not so simple *lol*
Wanna sneaky eensy teensy tiny preview...?
And that's all you're getting until later :)
Thanks for coming by... and I'm hoping to catch up with you all very soon!


UPDATE 1am GMT 28th May...
Blogger has done it again! I've managed to post one comment, and I can't do anymore :(
So...
Dawn http://everydaymemorieswithprojectlife.blogspot.com/
Helen http://itsallfiddlefart.blogspot.com/
Sheridan http://notimeforwashingup.blogspot.com/
Jules http://scrappingmojo.blogspot.com/
Laura http://followingthepapertrail.blogspot.com/
ScattyChick http://scattychick.blogspot.com/
Terri http://terriann87.blogspot.com/
Alix http://creativechaos-alix.blogspot.com/
Krystina http://www.lollipopscards.com/
Karen http://talesfromthescrapheap.blogspot.com/
Glen http://mylifemytreasures.blogspot.com/  (97!... neither you nor your mum look old enough for her to be that age!)
Debbie http://scrapsfromabroad.blogspot.com/
Sian http://fromhighinthesky.blogspot.com/
Dawn http://craftydawn.blogspot.com/
Beverly http://sugarstamper.blogspot.com/
Anita http://inkyblossom.blogspot.com/
Kat{e} http://funkytales.blogspot.com/
Rachael http://elliottmess.blogspot.com/
Sutty http://fruitofmyscraps.blogspot.com/
Alana http://thelittleblueshed.blogspot.com/
Sandra http://allthingspretty-sandra.blogspot.com/
Jane http://happypapercrafter.blogspot.com/
Fran http://fran-thescrappinhedgehog.blogspot.com/
Lesley http://lesleyandaloadofscrap.blogspot.com/
VooDoo Vixen http://scraphappenshere.blogspot.com/
Georgina http://scrapwhispers.blogspot.com/
Leigh http://charitycrafter.blogspot.com/

And possibly a few more I've forgotten momentarily... I really have been reading your blogs and getting inspired, find myself smiling, wondering how you do it all, and a gazillion other things too... only blogger won't let me leave you a comment to say I've dropped by to say hi!

Tuesday 24 May 2011

What is up with Blogger this time...???!!!

Sorry guys, but I've tried to leave messages on so many blogs... and Blogger just won't let me - I have to keep signing in to leave a comment, and then instead of publishing the comment, I get shifted to signing in again. Darn it! Wish Blogger would sort out their problems!
ARGHHHHHH!!!!!!!!!

Monday 23 May 2011

**UPDATE (travelcase mini)

Apart from a few little flourishes (dangly charms, etc) the mini album is complete. I made a little journalling/notes book mimicking a passport, and also changed the camera mini too (making it less bulky).
The 'passport' is slightly bigger than a real one, and is embossed with gold stamped images on the front cover - so easy!
Now it's back to another unfinished project - the mini to go inside the book cover...  but my mojo stopped jiving and is having a little sleep *lol*
And... talking of sleep - wanna see how the kitties are doing...?
Here they are...
Sleeping!
Their eyes are opened now... and they are getting so big! Poor CallieCat is a bit overwhelmed I think - but she's doing okay... and is such a good mummy!

Saturday 21 May 2011

Crafting Mishaps #2

After the whole terrible episode with the glitter, I thought crafting errors would be avoidable - I am trying to be careful! However... there is one crafting tool I now know that I cannot do without. A hairband.
Yes, a simple little piece of elastic would have saved me a lot of trouble yesterday. I was finishing off the pages of the mini-book I had been making, and was using my hot glue gun to seal the bottom of the pages.
Yes, I can hear you now - warning me of the dangers of blistered thumbs (that was last week... and it still hurts!). So ... what has hot glue got to do with hairbands? Well, you have to also place into the mix a little bit of utter stupidity :)
There was I, fixing the pages of the mini-book, leant over the desk squinting with concentration (and, yes, I DID have my tongue poking out of the corner of my mouth... it really does help!), when my glue 'blobbed'. This little hard lump of glue splattered from the nozzle of my glue gun. Of course, I turned the nozzle towards me to look at what had happened - and forgot to lift my finger off the trigger. Hot glue squirted into hair does NOT come out easily! If only I'd had a hairband tying back my hair... then I'd only be picking set glue off of an old apron *sighs*.
Is this the end of my tale of woe...? Not likely!
After this "glue vs. hair" fiasco, you'd think I'd be a bit more careful....? Not I! Some may call it bravery... most would call it just plain old dumb! But I was on a creative roll... I was getting this mini completed, and my mojo was jiving! Paper needed trimming, so out came my guillotine. Oh... I can hear the groans now - someone as careless as I actually owning a guillotine cutter! Yes, I do... it has a sliding paper trimmer too :D
I leant over the guillotine, measuring up carefully (measure twice, cut once... as my granddad used to say). The paper was definitely round the wrong way, I thought... so I slid it out, turned it round and slipped it back under the guillotine blade. And somehow got my hair slipped under too. Hair and guillotines don't work well together - this I should have realised when remembering all those old films about the French Revolution. There is a reason the axe-man has his victims hair tied back before bringing down the blade, you know! Yes... my hair was pulled by the blade - and if it was the side with the glue on it, I wouldn't have minded so much. Luck was not on my side. So Now I have a sticky-together hair piece on my left, and a baldy patch on my right... *lol*

Travelcase Mini

The travel-case mini is almost completed (big cheers!).
I've created my own little camera mini to go inside - though I am going to change the inside pages I think... make them less bulky. The 'lens' on the camera-mini is actually a frame for a photograph to slip behind, and has acetate covering it (I even made a little acetate aperture for the square bit you look through - have no idea for the technical term for this). I used Core'Dinations Black Cat cardstock to make the camera mini, and distressed it with silver ink to make it look older.
The wallet is a simple affair - just a few slip-pockets to hold travel memories... ticket stubs, etc... or smaller photographs (though it is a fair size, and could hold a normal size photograph easily).
The actual mini-album is housed in the bottom of the case - and it is GORGEOUS!
It's held loosely in place with ribbon. I made my case differently to the instructions - I have a large hinge at the back of the case - and so I also used ribbon attachments to stop the case from opening wide (this protects the hinge). The closure I created myself from Kraft paper and velcro circles to hold it in place. Of course, the fun of a mini-album is using someone else's measurements and then changing everything to suit yourself! I'm going to make a little journalling booklet to go with this - and make it look like a passport (deep burgundy red, methinks!)... it'll look adorable! *lol*
The lid of the case has a compartment that drops down... this is where the camera mini is hidden away.
I LOVE this mini - possibly the favorite of all the mini's I have ever made or even seen... now all I need is my own little craft room to show it off in :)

Wednesday 18 May 2011

WOYWW 102

Another very hectic day... half past nine at night and I'm just showing my desk for What's On Your Workdesk Wednesday!
Seriously... mine is such a mess right now... Thank you so much Kathy Orta (Paper Phenomenon) for getting me started on the travel suitcase mini :)... now I have less time than ever! *lol*
The mini is on the far left... it's coming along nicely (though the inside is completely bare right now).
We have the 'always-there' carousel full of bits and pieces that I'm using right now (rulers, scissors, pens, glues, scor-tape... so much!), crop-a-dile, scraps of paper, cold coffee (again!), distress inks, alcohol inks, Basic Grey precision file set, ribbon to match the mini-in-progress, brads... and cutters??? Goodness knows what they happen to be doing there *lol*. Just coming into view on the right is my netbook...oh, and todays paper which is as yet unread (no time!).
A quickie look at the suitcase mini so far...
and a cutsie look at how the kittens are doing today (still such a distraction!)
They have temporary names, starting with the ginger tom and going clockwise, they are:
Max, Boo, Sox, and Missy.
Sox (black and white ball of cuteness) already has a home with my eldest daughter... and Boo may be staying with me (though he'll definitely have to have his knackers knocked off!).

Monday 16 May 2011

A New Project

As some will already know, I love making paper flowers. I bought a book at the 99p store and started using the pages to make some flowers... and then sat back and thought about what a lovely cover the book had. So, I decided to make it into a case for a mini-book. The mini to go inside hasn't even been started yet, but I have finished altering the book to accomodate it...
I didn't want to cut into the pages, and use any of the 'insides' of the book as a casing... I thought of making a small box to sit inside the cover - that way I'd have more space for the mini-book I'll make to fit inside. It's not very deep, so I'll have to take that into consideration when making the mini. I used the g.c.d 'Paris Nights' papers, and the 'lid' of the book is held shut simply with a magnetic fastening.
I was wondering whether to use gesso to make the inner box look like pages (it's quite easy - just layer the gesso on, and as it starts to dry off, make patterns like edging paper onto it), but have decided to keep it just as it is with the 'Paris Nights' papers showing. I did have to buy a second book the same - it just seemed so wrong to annihilate this lovely book and not have it to read anymore. The book is a Charles Dickens novel - "Our Mutual Fiend (Part II)"... it's slow reading, but quite humourous in parts - though I can't say I'd recommend it at all (gasps!).
Anyway, enough rambling on about the content of the book... I just wanted to post to prove that I really don't sit and stare at kittens all day :)

Tags... again.

Yes, I made a few more... whilst staring at the kittens (they are SOOOOO cute!). Four more after this, and my box will be full - so I shall probably start doubling up tags in the pockets...


Blogger Had An 'OOPSIE' Moment!

Ah... the intricacies that are the Blogger Nation... my "What's On Your Workdesk Wednesday" post disappeared for quite a few days - nobody was able to get into Blogger, post anything, comment on anything or even have a blog-whinge about Blogger being kaput!
Well, I've had a productive time whilst Blogger has been 'down'... if you class "Oohing" and "Aahing" at kittens for at least 10 hours a day productive :)
Back to the Blogger grindstone then...

Wednesday 11 May 2011

WOYWW 101

I so nearly forgot it was Wednesday... so busy was I forgetting my 17th wedding anniversary and pandering to a kitty-in-labour yesterday, that my mind has pretty much turned to mush!
So... my work desk today for WOYWW:
Once again, a messed up mish-mash of craftiness. I decided to make a few more tags today so there's a basket FULL of about 200 tags, and covered with a storage box for ink blending bits and bobs. Acrylic stamp block and some verse stamps, distress inks, glues, small round punch, my carousel, tag box, daubers in a box, my favourite glue... oh, and the middle of todays newspaper with the puzzles that I haven't managed to finish yet, as the cat and her kittens are next to me in their box. Cute little kitties are so distracting! *lol*

KITTENS!!

My proud (but very tired) kitty-mummy Callie with her four bundles of mewling joy :)
I put the numbers on to show the order they were born... aren't they just the cutest?

Does This Make Me A Furr-Grandma?

Callie-Cat had her kittens a few hours ago - four little beauties! First one was grey and white, followed by a black and white one... then a gorgeous creamy coloured kitty, and lastly a darker almost ginger kitten - but not a lot of tabby showing. Anyways... she started at 7.30pm (thanks, Callie, I missed 'Enders... again! *lol*), and finished just before midnight. We're actually waiting to see if she has one left to birth - or whether it's just a phantom or one she's hanging onto for a while. I'll post photographs (but not the really yucky ones!) after I've had a nice long sleep :)

Not really a crafting post, this one... unless you count this as a fore-warning of a few 12x12 layouts full of little kitty photographs.
Oh.. and as a quick afterthought - it was quite nice of Callie to produce her kittens on my 17th wedding anniversary. Who knew 17 years was 'fur'... I always thought it was amethyst :)

Tuesday 10 May 2011

My Rosie-Posy

Callie-The-Very-Heavily-Pregnant-And-Oh-So-Annoying-Kitty cat has finally removed herself from between myself and the computer, and I can finally post my most recent layout.  Gotta forgive the kitty - she's due any day now, and is just attention-seeking and wanting lots of time with her furr-mummy (that's me! *lol*)
So... for the layout...
This started off with a set of papers I had in my stash drawer for so long, I thought I'd never use it. The faded rose-hues matched perfectly with the flowers I had made... and so it was finally opened and put to good use! The paper pack is "Rose Pink" (PK004) by 'Crafty Bitz', and I used two sheets of the papers:
Pink Roses (PA027)
and a plainer sheet with hues of peach and green (PA028)
Out came my La Blanche swirly stamp again - how would I ever craft without this? *lol*
I used Distress Inks in Tattered Rose (TIM20240), Victorian Velvet (TIM27195) and Brushed Corduroy (TIM21421) to ink up and distress the edges (and for the swirly stamping too), and I used the 'Angel Mist' Cosmic Shimmer and a couple of masks that I made on the paper too - not that it can be seen in the photograph.
The lettering is PaperMania glitter alpha chipboard (PMA355200)... but everyone knows "I don't do glitter", so I coloured them with copic markers (browns and rusts) and added a bit of distress ink too. Of course, I have to mention that beautiful, beautiful vine.
This is a "Dusty Attic" (Australian company) border vine shape (DA0459) - it's a laser cut die that you colour yourself .... and I got mine from an amazing online shop called "The Craftz Boutique" , whose customer service and online shopping experience is second-to-none.
I coloured the vine with the three distress inks I chose to co-ordinate with this layout, and then spritzed it with the Angel Mist Cosmic Shimmer Spray.  This layout was (as usual!) finished off with hand stitching... but although there's quite a bit, I really enjoyed completing this layout and trying out the different stitches.
Well, that's it from me for a while... the cat is back and mewling like she's ready to drop her kits. Poor kitty - she can't jump or even walk at the moment, she's so huge! I just wish she didn't crave my attention 24 hours a day. Waking up at 3am with a hugely pregnant cat sat on your chest and licking your face is not the most pleasant of experiences :)

Friday 6 May 2011

And The Obsession Starts... More Tags!

Only two more... and that's it - promise! Well, when I say "That's it", I obviously mean that I won't be doing any more until I have the time :)
These were pretty simple - I tend to make everything in pairs - have two tags, then cover them both in the same paper, and use similar techniques on them. These were sprayed with a mix of Cosmic Shimmers (different for each tag), wrapped in scrunched clingfilm and dried.
Butterflies and lots of stamping of the quote:
"Enjoy the moments that make you happy"
to cover one tag - and then I wrote over one quote to make it stand out a bit.
The butterfly has a texture to it - I covered it in clear-drying glue and then patted it with my finger whilst the glue was still wet.
The quote on the other tag is from a Sheena Douglass stamp:
"Faith is the bird that feels the light when the dawn is still dark"
I used images from a painting called (I believe) 'Orchis' by Rowena Stott (Country Diary Of An Edwardian Lady), and the top swallows I covered in sepia accents.
To be honest, these little tags do have a lot of work and creativity in each one... but because the area is so small (12x6cm) it's a lot quicker than a scrapbook layout. However, I'll not be giving up my beloved scrapbooking - I've a new layout finished that I'll be posting soon that's quite pretty... I used some of the flowers I made (finally! *lol*).

A quickie reminder too, that all this tag-a-mania started with Debbie from Canada
Her efforts show how it's supposed to be done :)

My First Tags

It's so weird, being a woman of a certain age (*mumbles* "ahem... in my forties"), and admitting to trying to do something for the first time. Okay, so this isn't stunningly amazing like I've jumped out of a plane, done an abseil from a huge height or finally pooped myself during a bungee jump... (please! at my age?!? *lol*)... but I have tried something new. And so now, the big unveiling of my very first attempts at "Altered Tags"... (drumroll please)...
Okay, so the drumroll was a bit over the top - they're not too brilliant... but I have to admit they look quite nice slotted away in my accordion box. The quotes on all of the tags are quite simple - some hand-written, and some stamped:
"In dreams we catch glimpses of life larger than our own"
"Live, Laugh, Love"
"Believe in your dreams"
"Listen to your heart"
"The road to success is not a path you find but a trail you blaze"

Some of the techniques used on the tags were fiddly but so much messy fun - like making my own transparencies with some packing sellotape and a sheet of freebie paper ("Country Diary Of An Edwardian Lady" 6x6  paper pack free with Cardmaking & Papercraft, issue 91 May).  I liked using some old techniques remembered from my cardmaking days - resist embossing technique... and also some newer ideas and creations - such as making small paper flowers.
I am itching to get out some thread and start stitching on tags *lol*... old habits die hard.
I have, on order, some lovely quote stamps... so hopefully I'll be filling my accordion box very soon - well, after the weekend when the grandbabies go back home, and I've had a chance to recover from their stay at Nonna and Gangads house :)

Accordion Inspire Box

My accordion box is finished... and I'm beginning to fill it with tags. I wanted something a little bit different, so I decided that this should be like an "inspire" book - so all the tags have a quote or saying on them, and I can just flip open the box and choose a tag at random and see what it says.
I used the gcd studios paris nights papers (item #486), and also Tim Holtz "Symphony" tissue tape (#TH92829) to cover the chipboard pieces. The 15 envelopes I used to make the accordion inside are just small money envelopes - perfect for 12x6cm luggage tags, or K&Co tags also, but the envelopes aren't big enough for journalling tags. I bought this pack of 50 money envelopes at Tesco (value range) for less than £1.
It's simply held closed with a cardboard shape that I've strengthened slightly by covering it with "Rock Candy" distressed crackle paint (TDC26686). I used "Rust" alcohol ink (TIM22169) just splotched onto the shape with my finger (still stained!) to give it an aged look.  Just a couple of added paper flowers from my stash drawer with fabric brad centres from trimcraft (Snowman collection, SNOWES01), finished off the outside of the box - I didn't want too much decoration.
 This is a very easy box to make, as it has no sides and only the way the envelopes are glued together and to the box allows it to keep it's shape when closed.
I can remember making these at school - well, something similar anyway, only these days it seems much more fun to do :)

Thursday 5 May 2011

Crafting Mishap!

My craft area (a corner of the dining room) is somewhat... bijou i.e small and cramped! As well as my 'system' of stacked boxes and things scattered on shelves, I've also taken over the sideboard, wall cupboard, and several other items of furniture that have spaces to jam my craftyness in... oh, and I also store 'stuff' under things too - space under the sideboard? ... crammed, thank you!. Lovely... lots of stash to keep a scrapbooker happy. Well, at least I was happy until last night. As many will know, I am not a glitter-loving-gal. I like a little sparkle every now and then, but huge amounts of glitz just isn't my style (I just wish I could use glitter as well as some of you girls and guys out there in blogland). So, my glitter collection (about 30 or so pots) has lain idle in the back of a drawer. Now... let me just give you a little sneaky peek as to how these drawers are ...
STUFFED!
Not much room left for anything... and as I think I need (and therefore buy) more 'stuff'... well, the 'stuff' gets stuffed... into any space left in a suitable drawer (there is some method in the madness of what's in the drawers... honest!)
And so, last night I was looking for some brads I knew I had - they're kept in the "brad, buttons, and sparkly-things" drawer. "Sparkly things" include bling and glitter. That's when I noticed... as I was rummaging, I got sparkly spots before my eyes... I thought I had some strange crafting disease (other than a critically ill bank balance!). I looked at my hands... oh, no! they were covered in tiny, tiny black spots... that glittered. I must be infected with some arty-farty illness that's crept up on me unexpectedly! Nope... on further inspection, I realised that some of my glitter pots had finally been crushed to oblivion in my drawer... expoding their sparkly contents with abandon over my brads, buttons, and other sparkly things. A deeper delve revealed the green glitter had also succumbed to the crush... a pretty little rainbow of glittery-ness in my drawer. Only it wasn't so pretty - or little! I had to empty everything out by hand (no tipping it onto the floor this time!) and clean off all my packets and boxes. After cleaning the drawer itself, reloading it, and putting it back in its rightful place, the dining room had been well and truly glittered. No amount of being careful stops glitter travelling around a room and getting stuck everywhere. I had a sneezing fit this morning and glitter sprayed from my nose!
Ah, well... it's all done now - I just need to find a safe place to put my glitter pots now - somewhere hermetically sealed with a time lock might be useful :)

Wednesday 4 May 2011

WOYWW... week 100

Week 100 it may be for many... but this is just my second go at 'playing' "What's On Your Workdesk Wednesday". And here it is...
Cold coffee and discarded jewellery on the far right, messy papers (Paris Nights GCD collection - love it!), Tim Holtz tissue tape, money envelopes, Scor-Tape, a variety of crafting tools, and my carousel that's stuffed with whatever I might need - or may have used - over the past few days (there's even feathers stuffed into the drawer from when my youngest daughter dressed up as Kesha, and needed a feather hair piece!).
All this, for the main, to make an accordion box to hold tags in. I haven't actually made any tags as yet... but when I do, they've somewhere to go :) This box was made because of a blog I visited, where Debbie makes the most beautiful tags... I was inspired. Visit her blog "Scraps From A Broad" here.

Wisteria tutorial...Part 2

Oh, yes... tis I again with another fiddly, annoying part to the wisteria bloom.
This is for the little buds that you'll need to finish off the ends of the spray... and you'll have to excuse the state of my fingernails in the photographs *lol*
Okay, so we start off with cutting out a small heart from a piece of paper - I didn't use any cosmic shimmer mist for the buds, as this would just make it harder to glue them, and the misting wouldn't really show anyway.
 Using a cocktail stick, roll the edges of the heart inwards - keeping the coloured side to the outer, and hiding the white side.
 Next you have to glue this carefully, and ignore the state of my hands and nails completely *lol*
 A six-petal flower shape is then used - I punched my flower shapes from a green piece of paper - either a 1 or 1.5cm punch will be fine. Then simply wrap the green flower shape around the top half (the pointy end of the heart) of your bud. That's it for those... now onto the slightly open bud:
 Cut out a smaller heart shape - and preferably a little fatter than the previous one used. Turn the heart shape colour-side-down onto your palm, and work the paper until it's a flattish cup shape. You will need to keep the crease down the middle, so squish that a bit when you turn it over to make it prominent...
 Preferably using the 1cm flower punch, and using the green paper once again, punch out a flower and then cut in in half. Wrap this half flower round what was the pointy end of your heart and glue. It's done - how quick was that?!? You can pinch the open end of the second bud together, and glue it carefully - and when using it on a layout, you'll need to use silicone glue, pinflair, or foam pads to keep it raised.
So there it is... three buds to make a wisteria spray.
The leaves are simply die cut rose leaves, embossed and then bent in half and pinched at the end to hold their shape. These were misted with cosmic shimmer mists, and held in place on the layout with silicone glue.
All the stems are simply stitched - the leaves stems have a little spiral at the end... just because I liked it, and wisteria has these little spirally tendrils too. To be honest, making these blooms was a fiddly pain! *lol*... AND... they look pretty dull and boring just sat there singly on their own... but put them together, and I think they look pretty good - even if I do say so myself *lol*
And please remember... If you enjoyed this tutorial and the wisteria, then I thank you... if you didn't like it, then you have Mandy to blame *lol*

Tuesday 3 May 2011

Wisteria Bloom Tutorial... Just for Mandy :)

This may take some time... but Mandy from UK-Scrappers (she also has a brilliant blog here ) wrote me the most lovely message at UKS saying a tutorial for the wisteria blooms I made might be a good idea.
So, here are the blooms we're talking about:
For this tutorial, I won't be spraying the papers with Cosmic Shimmer Mists, as the glare from the shimmer will make it too difficult to see - it was bad enough trying to take photographs with the sun shining so brightly through the window. I'll do the tutorial for one bloom - please bear in mind you'll need about 10-15 of these. I used pale purple lightweight paper, which I glimmer-misted and left to dry (a heat tool for drying is fine too).
To make the bottom part of the bloom you'll need a five-petal flower shape - a small one. These measured about one inch across - and as you may start to guess, this is the fiddly part...
Fold up the bottom two petals so the bloom is almost in half. The 'X' shows the petal which you will need to glue to the main flower part. For the remaining four petals, fold themtogether and give them a little pinch. Where the white shows on this part, you'll have glimmer-misted/inked/painted your bloom.
Next you'll need a cocktail stick.
Roll the four bottom petals outwards and, starting with the inner petals, glue them together. Try not to get glue on the back petal, as when this is glued to the other part of the flower, you need a little space. When all four petals are stuck to each other, set this piece aside... the fiddly bit is now over! *lol*
For the next part of the wisteria flower, you'll need to cut out a rough, fat-looking kidney bean shape from your paper. Use whatever you have handy (rounded end of pencil or pen, small spoon, etc) to shape this into a sort of flattened cup shape - I do this in my hand.
When you do this part, the white side will be glimmer misted, and this is the side that needs to be on the inside of the 'cup' - I've used the coloured side to show the bloom here (sorry). Use a yellow pen/ink/paint to colour a small part of the bloom at the bottom. Easy-peasy, lemon-squeezy, huh?!
Turn over the 'cup'. The 'X' marked here is on the reverse of where you just painted it yellow on the other side.
Now glue the 'X' marks together. The four rolled petals should sit nicely on the yellow part of the wisteria bloom. Now you'll need to punch or cut out a six-petalled flower in green paper - not rounded petals, but more spear-shaped.
Cut one of these flowers in half, and then stick it to the wisteria as shown below - so that two petals stick out each side at he bottom of the bloom, and one is almost hidden by the four rolled petals.
Et, Voila! You now have a wisteria flower.
Of course, there are a couple more componenets to making the whole wisteria spray - so the next tutorial for that will be ready soon.