Wednesday 30 January 2013

WOYWW #191

Oh, dear...
I did what "they" always say to do, and I wrote out a list because "they" say that with a list you won't buy things you don't need.
What "they" fail to realise is that:
a) The list on paper in my hand and the list in my head are two different things entirely
and
b) when TWO shops don't have what is on your list (paper or head list), but have a 'SALE' section, list-be-damned!
One shop said over the tannoy system, whilst I was scurrying around the crafting section for the umpteenth time desperately seeking 3/16" eyelets, "If we don't stock it, you don't need it". Hurrumph! to that! They didn't stock it, and I needed it!
So I did what any woman in my situation would do... I shopped :)
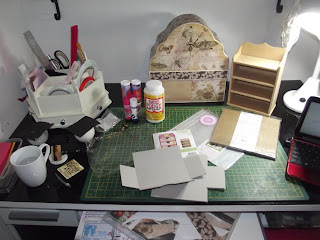
Two shops and under £30 later, here's my little haul:
And yes, this really is my desk today... how tidy is that?!?
I had craft night at Pickwells Tuesday night, so all my crafting gear was packed up ready to take with me... only I was let down for a lift at the last minute, so wasn't able to go. My desk was an empty space, so I placed all my new-bought goodies onto it and thought I'd post a piccie.
Trouble is, a tidy desk is definitely a boring one :)
Next week, I'm sure it will be back to it's normal post-bomb-blast self *lol*
If you want to share your workspace piccies, pop over to see Julia at The Stamping Ground and follow the instructions for "What's On Your Workdesk? Wednesday"
Spend some quality time being a nosey so-and-so and peeking through the wonders that are other people's crafting work spaces.
Have a wonderful WOYWW everyone!

Just a quick add to answer the questions from yesterday:
No-one stocked any Graphic 45 papers
The punches were boring and totally un-tempting
Haskins had run out of carrot cake!
This along with the frustrating lack of magnetic clasps/snaps, brads and eyelets - and being woken up a quarter to four in the morning by a rain-soaked and muddy kitty stomping over the bed,  made my day somewhat of a disaster!

Tuesday 29 January 2013

Oh, Men!

I had to share this...
A few days ago, here I was sat typing away, when I was distracted by something flying in front of my face. I turned in my chair, but could see nothing - maybe just a trick of the eye then? I carried on typing... well, for a couple of words anyway... it was then that I realised my "T" key from the computer keyboard was missing. Yes, it was my "T" that had flown across my vision. Do you know how hard it is typing without a proper "T"? I wondered as I typed what words I can use to replace words with a "T" in them... and it's so slow when there's no "T" and just a little rubber nipple instead. You realise that the English language is littered with way too many words containing the letter "T"! It's a conspiracy - or a conspiraTy :)
I complained to hubby - dropping a few hints that maybe I needed a new computer with a "T" that worked? Hubby needs the hint to be wrapped around a brick and aimed at his head to notice it. Still, he went shopping that evening, came home and put the shopping away then came upstairs to my craft room.
"I've got a surprise for you" he said.
Oh...oh...ohhhhh.... my mind raced, I held my breath, and waited for him to step inside my crafting haven with a new laptop in his hands.
"There you go" he said as he placed his gift on my workdesk.
It was a cup of tea.
Yes, hubby really can't take a hint. He thought I had been complaining that I couldn't work without a TEA... not a "T" key.
It was a nice cuppa though :)


Right, I have wittered and whined enough... time to get ready for a trip to HobbyCraft. Oh, the temptation is going to be so great - will I resist the Graphic45 papers, the punches, and the carrot cake from Haskins next door?
I only need sticky dots and small magnets... but what will find it's way into my basket before I get to the till?


Crafting Mishaps #5

Just because I haven't written about a crafting mishap since October 2011, does not mean to say that they don't happen any more... just sometimes it's too embarrassing to reveal them! I mean... can one person really be so dumb?

For years I've owned an ATG (Advanced Tape Glider), and have always finished off placing a line of tape on a page with a little flick of the wrist to break the tape. It has limited me somewhat, as it really hurts my wrist joint. Today, whilst crafting and making some more pages for my mini album, I discovered that all I have to do when I want to stop a line of sticky, is to take my finger off the trigger. Why on earth had I not figured this out before???
I really should have dyed my hair red when the kiddies asked me too - I am such a dumb blonde!
The ATG mayhem does not stop there...
Poor little Miss Violet (Baby, one of our kitties) is not happy with me.
I had been making photo mats for the album, and trying to get a sort of conveyor belt thing going? Cutting all the mats, inking them, taping them, then sticking them all onto the bases. Easy :)
I had the photo mats all lined up, ready with the ATG tape  on them to be stuck onto the backing sheets. It was at this moment when Baby jumped onto the craft desk... and placed her little paws onto the sticky photo mats. Oh, she did look a sight, taking a step and violently shaking a paw to get the paper off of it. I tried to help - really I did... but laughter isn't conducive to helping kitties from sticky situations. Oh, my! She glared at me so much!
This glaring was nothing compared to the hisses I got when I took her to the bathroom to gently wash the tape from her pawpaws.
Perhaps now she'll stay off the craft desk?
Not likely - she's here now! *lol* It's like she knows the ATG gun is the source of her sticky paws, and she's sat here eyeing up like it's going to be supper as soon as my back is turned. Time to hide the pink gun, methinks!


What Kind Of Woman Am I?

This is NOT a crafting post :)
I was just sat here, thinking to myself...
"Am I a 'behind-the-bike-sheds' kinda gal... or more of an 'up-the-treehouse' adventurer"?
Either way, it's probably best in either situation that I don't have egg-nog, as I'm likely to throw up. Maybe a gin & bitter lemon, a Sheridans or a Baileys?
If you think this is all a bit random, but still enjoy a smile, then I suggest you take a quick trip over to Pixies place and get involved! Make friends with her pals, and join the gang :)
Gosh, I haven't giggled so much in ages!
Up a tree house, indeed! Not with my head (or lack of) for heights... I'll just stand look-out :)

And a quick Congraulations to Di... wow, 800 posts (plus)!
You'll wear your fingers out!

Monday 28 January 2013

A Crafty Snippet :)

This post is a bit photo-heavy (8 or 9 piccies I think) so I do apologise for that.
Anyways... I thought I'd share one page of the mini-album I'm making - it's all made from scraps and leftovers from previous projects (as I'm in a super-frugal frame of mind!). So far I've made 5 pages, 2 envelope pages, and 2 chopped pages... this is a 'chopped' page - so called just because it's smaller than the main pages. As it's all made from scraps and stash-finds, I thought I'd enter into Pixie's Crafty Snippets (week 57) and try to win a little prize too. The prize is just a bonus - the fun part is seeing what other people can do with leftovers and 'snippets' from their crafty stash. Pop over to Pixie's Crafty Workshop and have a go :)
So... here's my page - the front:
The red patterned flap opens up to reveal a journalling spot and a photo mat...
The photo mat is just held onto the page by a band and a small semi-circle piece of card, and slips out easily so you can see the pretty paper underneath...
Next, another photo mat will be revealed if you pull the journalling spot upwards and out of the pocket...
 Turn the folder over and there's a journalling spot...
This opens up each side to reveal another photo-mat and two more journalling spots...
Now onto the back of the original page - the pocket... showing yet another pocket with another photo-mat...
The phot-mat can be taken out completely to show the papers underneath.
All the photo mats can hold photographs 6x4" - I've tried to keep all the spaces for photos as large as I could, and then used smaller spaces and tags for journalling.

I'm trying not to throw out any pieces or scraps of patterned card until the project is finished - and then using all the small pieces within the project. It's easier than I thought it would be so far - especially with so many pockets that are matted with small pieces of the patterned paper, and I've also made quite a few pages where a photo mat is held to the page with a simple band of card and a half-oval at the bottom of the page.
So... a crafty snippet.
Don't forget to pop over to Pixie's Place and join in :)

love Love LOVE Stampington & Co!

I wrecked my favourite stamp. It was one I had bought second hand from EBay a LONG time ago...and I loved it! It has been so well-used that I wore it away, and the rubber started to disintegrate :( I've tried so hard to replace the wooden-backed stamp... but nothing was available. So, I looked onto the online site of the makers of the stamp - Stampington. I didn't think thay would still have this stamp after so many years... but they did! I ordered it (and some gorgeous 7Gypsies tissue papers), and then waited not very patiently, for the postman to deliver.
I have to say that, as usual in these matters, the postage was incredibly reasonable - and the prices for crafting supplies so much cheaper in America than here in the U.K. I've even written to JoAnnes begging them to send items over here - but they've no plans to do such a thing right now   :(   *spoilsports*
Anyways... here's what all the fuss was about... my lovely new stamp:

Now I have to find a way of incorporating the old wooden block from the original stamp into some sort of project - it's so grunged up and old looking - gorgeous!

Busy, Busy, Busy...

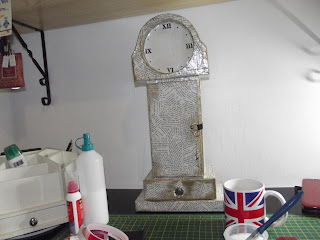
I have been so busy crafting, that I haven't had time in the last few days to blog anything. But that's a good thing, right? My mojo has returned from vacation with a zing, and I'm raring to go, firing on all cylinders :) I'm making some of the items that will sit inside the new clock case I've finished (yes, I've actually finished the case now) - starting with the 'mini' book.
Trouble is, I'm a messy crafter... as my mid-flow workdesk will show:
What a disaster area! Still, it does show just how 'tight' I can be... and maybe quite inventive too :) I don't have a craft-sheet (and think they are so over-priced too!), instead I have a large cork coaster that my mum was going to throw away, slipped into a plastic bag that some 12x12 papers came in. I can blend inks into papers so easily, and wipe up any mess left on the plastic covering with a baby wipe ready to use again and again :) I even keep the babywipe in a plastic bag so that is stays dampened for longer, so I can use it for days :)
Now I need to find a way of making cheap blending sponges...
I'm even trying to make my workspace a bit more 'green'... by having a recycling bin as well as a 'normal' bin in my craft room. Any bits of discarded card or paper large enough to recycle are promptly placed into the correct bin. Cardboard packaging is stripped of  sellotape and sticky labels and recycled (or given to hubby to re-use for his E-Bay hobby). I'm trying to use little bits of paper leftovers on my mini-book pages... and toying with the idea of turning tiny scraps into whole new sheets of paper - though I have no idea how difficult or easy (or messy!) this may be.
So, what's your crafty-frugality? How do you save money - or the planet - with your hobby?

I'd love to know of any tips and tricks - time to share!

Friday 25 January 2013

KaiserCraft Drawers Finished

I decided before decorating these drawers, that they would be for my youngest daughter Beth - a little gift because she's worked so hard at college. The trouble is that her tastes are somewhat eclectic... she's into naval/sea themes, shabby-chic, vintage, old maps, steam punk, market, british, quirky and grunge... sometimes all at once at sometimes not at the same time!
So... how do I make and decorate a little set of drawers for a young lady with a huge range of tastes? I started with her favourite (sometimes) colours of blue and green... and kind of made it up as I went from there.
I had in my head some sort of idea where the drawer set would look like it had been found under the sea - like treasure. For this I needed the finished product to have some sort of patina or rusty effect.
I started by painting the chipboard shelves (glued together with aliphatic resin) with a mixture of: gesso, poster paint, white glue and dye. This dries really quickly, and after an hour, I rubbed back some of the 'paint' to reveal the chipboard base. Next I rubbed 'weathered wood' distress ink onto the exposed edges. I knew that I would use silver alcohol ink for the top layer... so I needed something under that to look rusty and worn. I just sprayed the shelves lightly with cosmic shimmers - a brown and a navy. then it was a simple matter of choosing papers for the sides and the back. I sealed everything with a modpodge mixture (gloss and matt - it's all leftovers!) and whilst that was drying I made up the  three drawers. I wrapped them in plain white copy paper, and then wrapped the front and sides with paper to match to shelves. I inked the edges with the same distress ink as used before. Mod podge out again... and I had to wait until this evening to finish off, as I caught a tummy-bug!
Here's the drawers waiting for the finishing touches:
Beth loved them as they were - but I wanted something a bit more 'finished'.
I used matching brads to decorate the front of the drawers, and then went slap-happy (or is that 'smudge-happy'?) with the alcohol ink in silver. A little chipboard piece (edged in silver alcohol ink too), and some baby blue liquid pearls, and Beth's little set of drawers is all finished. She's chuffed to bits with them :) She's just lucky that there isn't a room in the house that matches the blue and silver theme except for her room... because I quite like them too :) My favourite bit is the way the ship on the side actually starts at the front on the drawer, though I am quite pleased with how the patina effect turned out - not bad for making something up as I went along *lol*

Wednesday 23 January 2013

WOYWW 190

It's been so long since I've had the time to participate in WOYWW – so I'm glad to find a couple of minutes to spy on other people's desks and work spaces today :)
For anyone who wants to join in the nosey fun, just pop over to Julia's at The Stamping Ground and follow her directions (though I cannot believe that there is anyone at all left in the blogosphere who hasn't heard of Julia and her Mister Linky's Magical Widget *lol*)
I'm at a bit of a standstill for creating right now... in between projects, and unable to decide what to do with either of them.
The clock is still there.. not yet stuck together, and the album (or whatever I do finally choose to place in the clock box) not even started yet. Finding myself at this impasse, I decided to tidy up (I must have been desperate!) and I found a KaiserCraft chest of drawers to make up and decorate. Only, I can't make up my mind on how I want to decorate it. Should I paint first then glue... or glue together and then paint? Do I want to decorate the drawers with wrapped patterned paper... or paint them first and have blocks of paper? Oh dear! I really don't know!
So... that's what's on my work-desk today (or rather 'tonight')... and even if I did want to craft a great deal, I think I might find it quite difficult. Baby wants to play on the desk so much (after being out in the melting snow and getting her paws all dirty!), and if she's not on the desk then she'll be playing around in boxes or hiding behind tools and glues on my shelves - as the following medley of piccies will show...


See what I mean?! She's even claimed my Blackberry Playbook and Kindle as her new toys!  And they're my toys! *lol*
Still... it's hard to get annoyed at such a cutsie-pie :)

Tuesday 22 January 2013

A Shop I Like

Seeing as I LOVE to share a good thing, I want to tell you about a shop I found online. When I desperately needed a Bo-Bunny collection of papers, I couldn't find them anywhere in the UK, and the shipping from the U.S was a bit high ($28!!!). I eventually found the barcode number and put that into a well known search engine. Hey Presto! I found a U.K store that supplied what I needed. The owners of the site are so sweet, so if you're looking for beautiful papers and scrapbooking supplies, maybe you should take an online trip to
They also have a
for extra news and stuff.
They post items really quickly, and you can collect points to redeem against future purchases.
So, there you go - a shop that I enjoy spending my money in :)

Need Some Crafty Advice Please?

I've been thinking about this clock I'm making - well, more about what I'm going to put in it, and I'd like some advice on some ideas - whether they're any good or not?
Seeing as I have several compartments inside the clock, maybe I could make an 8x8" scrapbook to go inside, with a year planner and then pens and pencils?
Or how about a large calendar and an address book?
OR... I could use it as a sort of writing set... address book and/or letters I have recieved (mainly from my Aunt Lorna) and make a scrap album with photocopies of the letters and the news we swap?
So... what do you think - or are there any other ideas out there that might be better?
You see, my problem really is that I make all these albums and then I don't use them. I use my pink and brown Christmas House album... and I gave away my large A Chest Full Of Memories to my LouLous on her birthday last year. Apart from those two, all other creations are unused - and I want to be able to use this clock as it could look fantastic in several of my rooms at home.

So please... put me out of my misery - help me decide what to do?
:)

Monday 21 January 2013

Someone's Got A Brand New Toy

Oooohhhh... that would be ME then!
This is NOT a crafting post :)
I am uber-excited with my Blackberry Playbook - a pressie for me:)
I don't usually like technology - basic rule of thumb is:
 The newer it is, the more confused it makes me...
But this has (so far) been really easy to use.
 
I have slept so little , and I'm shattered (check out the bags in the photo - under they eyes! *lol*), but having a play around with this little bundle of techie-joy seems more fun than going to bed and catching up on (much needed) beauty sleep.

I really should be working on my clock project too... maybe later!
Crafty updates next time... promise :)

Sunday 20 January 2013

A New Project

When I posted about my new storage boxes, you may have noticed sat on my desk some oddly shaped chipboard boxes beginning to take shape:
When I was sorting through my huge amount of stash, I came across some leftover pages of a paper pad I had used in a project ages ago (Memory Trunk)... one of my very favourites - "Mariposa". The problem with many of these scrapbook pages, is that they are just too pretty to cover with photographs and journalling, and it's hard to embellish a page that is already so ornate with decoration. So, they've sat in a drawer waiting to be rediscovered. I also had left over a clock mechanism, torn book pages, scraps of chipboard and so many other bits and pieces! I grabbed a whole load of inspiration from Kathy Orta (Paper Phenomenon - see link on the right) and have started making a mantle clock. It's a bit on the large size, as the clock mechanism I had needed about a 6.5" diameter clockface. Kathy's version is about 8 or 9 inches wide I think... Mine is nearly 12 inches - and just as high too! At the moment, it's in pieces as I'm doing this project slowly - adding and re-jigging things as I rediscover what's hidden away in my stash pile. Even the mod-podge I'm using to 'lacquer' the project is leftovers - a mixture of what I found in the bottom of old bottles. Instead of numbers for the 'dial', I've used some brads leftover from a previous project.
As I wanted this clock to be different from the grandfather clock I have recently finished, I decided that after covering it with the torn book pages, I would paint the edges (Gesso so thick it needed to be thrown out, but mixed with very cheap leftover childrens white paint to thin it out) and then age the edges a bit with some ink. I'm being so frugal that I even washed out and re-used a dilapidated old blending sponge that really had seen better days! The paper I chose for the back would have lost a lot of the wording - which is my favourite bit - had I cut it as is... so I used the top part of the paper for the bottom part of the clock base.
The inside is still a bit 'bendy', something which I hope will better itself when the middle banding is attached. I'm keeping the inside just as the torn pages design. I knew that the leftover pieces of chipboard I have really wouldn't be big enough to fill the whole space - so I put in dividers. I thought that I would use the long space for envelopes and letter paper, and the smaller spaces for pens and pencils - leaving a space large enough for an album that can be made from scraps - the space is about 9"x3".
The album will be bound with rings - as I found some lurking in a drawer - so that's just more leftovers to use up! What a shame my New Years Resolution wasn't to use up as much of my stash as I could - I'd have been doing brilliantly with that :)
I'm actually doing quite well with my resolutions...well, a couple of 'mantras' really:

Housework before Craft work!
and
A tidy desk is a productive desk!

We'll see how long those last! *lol*
Well, I've rambled on for a while now, so I'm off to look for Miss Violet - Baby does love to play in the snow! (Unlike Callie, the sensible cat and Lily the old dog).

Keep Crafting Happy!


Saturday 19 January 2013

Storage!!!

I am no longer an Ikea-Virgin!
Hubby took me there today so that I could buy a few storage boxes for the craft room. It's been so messy here, that I wanted something co-ordinating and big to store away (read: "hide") all my little bits and pieces.
I also decided to finally have my scrapbooks ready at hand. They have always, up till now, been kept in a cupboard downstairs... and it feels great to have them handy where I can look through them whenever I want to now.
So... a piccie of what the shelves used to be like...
Violet making good use of any space available for her to snuggle up in and sleep - though I can't imagine it was too comfortable!
I bought just plain black boxes, and because they were quite big (!) I used some luggage tags I had, and wrote on them what was inside the boxes.
I bought enough boxes to store all the jewellery making items I have too,
and I also used a couple more for 1:12th dolls house items and for bits and bobs (shown in the previous post).

I think that Ikea could be fun, as long as you're not looking (in the wrong area) for something specific, and you weren't on a time limit. I found it quite stressful, being my first time.... but I am going back next week just for fun!

Actually, I was a little bit of a rebel in Ikea. For anyone who's never been, I will explain that there are huge arrows painted on the floor, and this is what you follow to get around, only being allowed to divert off the path if you come to a designated 'shortcut'. Now I don't know how they do it in Scandinavia, but I was quite offended at being told which direction I must walk around and browse a shop in... so I purposefully went against the arrows. I felt quite naughty! *lol*. Me and Hubby wandering around as we pleased whilst everyone else kept to the 'proper' direction, following those darned arrows!

Next week, I shall use the restaurant as a shortcut... it's not a designated shortcut, so I may get into trouble *lol* They can't really ban me though... I have family working there :) Not that I'd put it past certain family members trying to ban me anyway *rofl*

So... here's hoping you're all having a fantastic weekend - enjoying the snow (if you have any) and not suffering because of it.
Happy Crafting, peoples :)


The Clock

I finally found a way of gettng photo's on here, so here it is...

Inside where the pendulum should be in a real Gandfather Clock, is where I've hidden my album...
It's simply decorated to fit nicely into the space.
Of course, you can see the drawer at the front - but it's actually two drawer spaces, not one. Under where the large album goes is also a little secret compartment for a mini-album.
It's very sturdy, and keeps wonderful time too :)
Not bad for a project made up of almost entirely leftover pieces of cardboard and chipboard. In fact, everything came from my stash except for the clock workings.

The Finished Clock

I finished the clock (a little while ago actually...) and I would upload the photographs... but I can't because Blogger won't give me the option to upload from my computer.
By the way... is anyone else having problems with uploading photographs? I have to download the pictures into Picasa, and then download into Blogger from there - it takes soooooooo long! At least, tha's what I did last time - and now I can't get into Picasa either!
Blogger and Google are so darn annoying!

Saturday 12 January 2013

Post-Holiday Humdrum

Christmas is over... and NOW we have snow forecast...?! How typical! Well, seeing as I live on a very sheltered part of he coast, the likelihood of it actually laying snow anywhere near me will be pretty remote.
I had been taking photographs ready to write some posts over the Holiday season... but time just ran away from me! We had a huge houseful on 'The Day', and yet I still managed to cook enough for everyone to eat a full plated dinner for three days in a row! Christmas Eve was a scream! My daughter and (hopefully-soon-to-be-) son-in-law came over and arranged a 'pass-the-parcel', with "Truth Or Dare" notes in between layers of wrapping... At one point, Hubby was barking like a dog to the tune of 'White Christmas', whilst Dan (son-in-law) was showing us all the face he'd make if he recieved a pressie he didn't like, and I had to admit what the worst present I'd ever bought was.
I've still been working around the house, and have started making scrapbooking boxes and albums again... Yay!
Here's the boxes I finally finished for the shelves I painted in the bedroom:


The only problem was that I had a lot of leftover chipboard bits that were 5x12" and 7x12"... so I used all the leftover bits and started to make a new box and album... I'm really pleased with this one - it's a grandfather clock, that will actually have a working clock in it... I'm so excited!