Monday 21 March 2011

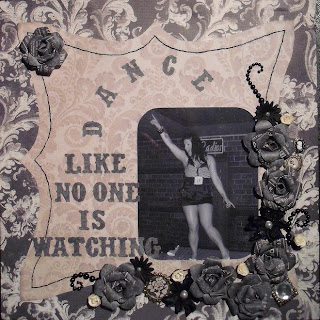
Dance Like No One Is Watching...

The layout for inside Naomi's wall box was slow in creation. It started off in my mind as a little, simple layout with the wording "Home Is Where The Heart Is" (or something similar). I knew that a photograph had to be found for the layout, and so I started looking... and looking... and still more looking...
I could find not a single photograph that would match the idea and theme of the layout. There were, however, hundreds of photographs of my bautiful daughter being crazy and funny... dancing like she was the only person in a room seemed a recurrent theme... and so a new idea for the layout came to fruition.
There were so many photographs of  Naomi that I knew would fit into the design... so I decided to make the layout in a way that Naomi could change around the photographs when she wanted to.
I usually create a layout around the photograph... whilst the photo is stuck to the paper. This time I had to make a layout bearing in mind that the photograph had to slp easily in and out of a pocket (I fronted this pocket with acetate).
A MEGA stash-dive ensued to find bits and pieces that would match the design... and I made the paper flowers and roses myself.
The papers (I sewed one piece onto another) are from "g.c.d studios", a Tina Higgins design called "Paris Nights" - really gorgeous paper collection - though a lot of the papers have a 'felt' design in them, and this makes it almost impossible to cut with a punch :) (including Martha Stewart punches).  The photograph is from the "Tesco Totties" holiday to Benidorm last year - my Naomi up on stage having a whale of a time!... Dancing like no-one is watching :) The title lettering is die-cut on my little sizzix sidekick - Tim Holtz "Vintage Market" (a VERY well-used piece of equipment).
Behind the layout is a slit in the backing paper so that the photograph can be changed, and also a pocket to hold all the other photographs that she can interchange. Naomi loved this idea, and the box has been made so that it is easily opened and shut again to change the pictures. The layout is held inside the presentation/wall hanging box with little velcro circles.
I so enjoyed making this - and it only took a couple of days (including waiting for the paint to dry). Naomi now has it up on her wall... and even if I do say so myself, it looks pretty good :)

The box...

Ah, yes... the box...
Darling eldest daughter has moved away from home (again!) and wanted a piece of art for her wall. Not any piece of art would do for our beautiful Naomi, no.... she wanted a 12x12 layout created by her mum, and set in a box. With mojo at an all time low and all ideas flying fast out of the window for a layout, I decided on making the presentation box first. Using a box that held a delivery from The Craftz Boutique last week, I cut the middle out of the front ready to place some aetate behind. The actual box had to be able to be closed and opened (more of that later), and also match her black and cream with gold colour scheme. I covered the box with newspaper (like papier mache) and then pages from an old book. Satin black wall paint was also used to paint the box inside and out, and then black ink with gold mixatives was used liberally over the whole box. I could have painted the back of it.... but time and absolute laziness dictated that what the eye cannot see, I cannot be bothered to change :)
I used ribbon to tie the corners shut, and also to hang the finished piece of art. Naomi is thrilled with it!

The acetate front is simply held on with brads (inked with adirondack inks to match the box itself), and it's designed so that a battery operated faux-tealight can be placed inside the box, to light up the layout inside. 

Where's the time gone?

I have a few moments before sloping off to bed to write a quick message here. There just aren't enough hours in a day lately! I'm looking after my beautiful granddaughter Lily at the moment - and she's only just nodded off to sleep (in MY bed!), so crafting isn't an option until she goes back home (how do you mothers of young children manage to craft at all?) Still, I have a few posts to make about what I have done lately - including a layout in a box for my eldest daughter Naomi who requested a "Mummy Masterpiece" to hang on the wall of her new home. I've made two more of the mini-brag books for the nurse at the local doctors surgery (my first commission!), and I've been planning a few layouts too. But, firstly I just had to share a little of my mum's amazing craftiness...
She's a lace maker, and now she also does tatting lacework - and she's so quick at it! She made me this beautiful bookmark...
The photograph does it no justice at all - it's so delicate and beautiful.  I'm so very proud of my mum - she's so talented!
My mum also bought me a necklace at the weekend - a real bargain, and I noticed it first because I thought how interesting it would be to use as an embellishment on a scrapbook layout. Mum, I promise I'll not use your gift on a layout, I'll buy another one :) Mum also bought me a matching ring - very pretty.

Just how gorgeous is this necklace - and a bargain at just a very inexpensive £1!
Thank you Mum!

Thursday 10 March 2011

Beer Mats!

Carolyn from Pickwells (yes, that wonderful local-to-me crafty emporium and veggie heaven! lol) handed me a pile of beer mats a while ago... "You might find something to do with these" she said. And I did. For a while, my eldest daughter Naomi tried flipping them off the table edge and catching them, followed by a mini-beer-mat-frisbee-contest. Callie-Cat found one quite interesting for about three minutes, and the dog had a sniff, but decided that without poseable thumbs (and the beer mats not being made from bacon) she really wasn't interested.  Which left it to me and some really amazingly cheap bargains - including Papermania brads and papers, the wonderful Craftz Boutique, 99p store book, and  £1 paper roses.

Front Cover


The front cover was spritzed with Cosmic Shimmer (Angel Mist) after being "Ranger-Inked" and stamped. The roses are also spritzed using Lava Red.


Page 1 has two photo mounts with journalling space on the back, and little key and padlock charms that I inked using black and plum inks. Page 2 has a simple folded down pocket decorated with a brad and ribbon, and a two-sided tag slipped inside decorated with another paper rose (lots of stickles used on all the paper flowers).
Page 3 has a journalling tag held under some die-cuts which I inked with brown ink, and then dabbed on distress embossing ink (not all over) to create an aged effect. Inside can be found 2 further photo mats, and these are covered on the reverse side with matching patterned paper (as are all the tags and mats). Page 4 is a simple journal booklet and tag held under two strips of lace.
I matched the butterfly on the 3rd page with a butterfly under the tags on page 4.
Next pages, and I decided to simplify it a bit...  a small tag is hidden in a pocket made behind the lace-up pocket. This laced pocket is designed not to open, but just to hold another tag. On page 6 is a simple photo mat that can be pulled out from behind the acetate covering.
The acetate is simply held onto the frame with small matching brads, and beause of the space needed for the rings, a ribbon was added at the side for a cover-up and decoration.
My favourite pages - 7 and 8! Both are very simple - a journalling tag being held under a chipboard piece and the page stitched around, followed by page 7 that has a simple photo mat held under some ribbon.
Under the photo mat is stitching, and the ribbon also has a sliding cardboard button (made by me) so that any photo can be held in and the 'button' moved up or down so that it doesn't cover any important part of the photo.
Finally, the last pages! Number 9 is a simple corner pocket decorated with leaves and paper roses. The corner is stitched and also has a tiny paper flower. Page 10 is two tags held in a pocket with stamping on one side (Angel Mist used again) and a journalling spot on the other sides.
I also decorated this page with a little stick pin (a free gift) with added embellishments - a butterfly and a bead.
The back cover is the same as the front in that it is coveed with a page of an old Charles Dickens book (don't panic - it was bought for 99p at the Discount Store, and I bought 2 copies - one to keep and one for crafting).

Well, that's my beer-mat-mini.
Looking at my latest projects, I am now going to set myself a task... that I should not use green, red, or brown in my next project - or only tiny splashes of said colours if needed. I really think that these must be my favourites, as I'm always using the same papers and colours!

Wednesday 9 March 2011

Brag-Book (almost-) Mini

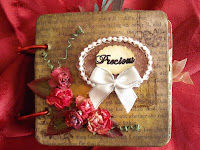
I just had to make a little brag book to show off some piccies of my grandchildren (any excuse!)... I bought a Basic Grey card making set on sale for less than £5 from Pickwells, and decided to use the papers inside to make my book (with enough left over to make at least 4 other cards with all the embellishments too!)
The pack included little magnetic discs too, so the book closes up and seals like a clutch bag.

Each page is also a pocket, and the pockets on each cover contain a scan photo of each of my granbabies. The first page is Alistair - lots of stamping with a La Blanche stamp (fantastic foam stamps that always leave a brilliant impression - I can really highly recommend these, and I bought mine from QVC) and stitching. The ink was Crushed Olive distress ink by Ranger. The initial "A" is stampes on the photo, on the background paper and also on the reverse of the photo, so it will always be seen nomatter what way round the photo ends up. A photo of my little Rosie Posie is in the pocket - taken a year ago.

I used a small brad and fixing to keep the photo in.

My little Rosie-Posie... gotta love that cute little girl. I stitched the letter "L" (for Lily) and used stickers I'd had hanging around for years to create her name. The flourish in the centre was a bargain at £1 - a basic Grey rub on... that has rubbed off more than it rubbed on (I don't do rub ons too well). The edges were stamped and embossed, then I drew around the flourishes with a white gel pen. The photo here is the only one that isn't removable. The pockets have photographs of Lily and me in one side (the reverse of the previous page), and a little folder with two recent photographs of Lily and Alistair together.

A photo of Lily at 1 year old and a recent piccie of Alistair on the next pages where I made a pocket and a simple stitched oval to frame the photographs. In the pocket, a photograph of Alistair asleep - he's such a cutie-pie-snuffly-baby.

Behind the photograph of Alistair is a sticker that looked so sweet, I had to use it.

Finally, another photograph of Lily and Baby Brother Aistair, held in with photo corners and a butterfly. I used the butterflies quite a lot in this way - glueing them onto light card and then cutting them out. These were pictures I had printed off a long time ago - I can't remember where I found them... but they're quite pretty and I use them in a lot of projects.

Well, that's my brag-book ... not a mini exactly... but just an excuse to grab strangers in the street and demand they see photos of my beautiful grandchildren. :)

Tuesday 1 March 2011

A Night Spent At Nonna's House

I had both Lily and Alistair stay over last weekend - what a tiring time... but so worth every moment. Lily was as cute as she always is - even when she lets one rip and coyly says "I farted!" with the biggest grin on her face (is she the only child to ever be able to fart on command?). Anyway, Alistair took a little while to get used to his Nonna feeding him and telling him that he was gorgeous (rather than his mummy being there to do it) - but when he did, he was so adorable! He even smiled at me (and, no, it really wasn't wind! lol). I took so many photographs of both my grandchildren... and of course had to have a new layout of Baby Alistair, because he's changed so much in the past month. The photograph I chose probably isn't the most cute one... but I love the expression on his face, as if to show that he was as surprised as me for him to be spending the night at my home.
I used Tim Holtz and Basic Grey (Snow Queen) papers, and stamped along the bottom using an Artemio stamp and on the top left using a Sheena Douglass stamp (A Little Bit Sketchy 2 - "Faith"), with Papermania bright teal and Color Box Chalk Prussian Blue inks. I embossed the bird on a branch and one stalk of meadow flowers with a clear embossing powder. I cut ovals out of the papers and distressed the edges (Tim Holtz distressing tool) and used Broken China distress ink to colour the edges a bit - the photograph also. Stitching by hand with embroidery threads and also cotton was used to add a little texture and interest to the photograph of Alistair, and also to highlight a circle around the letter "A". This letter is a glitter cardboard from Dovecraft. I inked it with the Broken China ink and then used Weathered Wood distress embossing powder over it... then added a little more ink when it was dried fully.
I had quite a few of my handmade flowers left over to match this layout, and I also added some Prima flowers from the Pastiche collection. There were literally hundreds of brads to choose from... and some of the best to match this layout were from Doodlecraft Designs Inc - the Boutique collection, Swimming Pool assortment. There are also Dovecraft brads, and some blue buttons. Some buttons are from the Capsule Collection, but most are plain, everyday buttons - as well as a pretty little blue glittery rocking horse button I just had to use!
The butterflies are called Fly Stickers by a company called KandyToys... they are very similar to the ones you can get from Anita's - but they come in a variety of sizes. I don't like the holographic patterned edges, so I cut them off - this makes the plastic backing quite difficult to peel off, but it is worth it if, like I feel, the sparkly backing doesn't match with your layout design.
I think that's about it - apart from the little blue roses which I buy from a local bookstore that has a small crafting section. They cost £1 for 28 blooms - not a bad price at all. I quite enjoyed the little finishing touches - like all the buttons being hand sewn onto the layout... it was a relaxing process after running around after the grandchildren!